Monday, October 29, 2012

One Big Oreo Biscuit Base

FIGJAM....!!!! Yep I said it I am good. If you don't know what FIGJAM is google it. You will laugh. 

Why am I good....???? Well my dears I came up with (I think) the first Full Oreo Biscuit Base. What does that mean...??? Well traditionally when making a cheesecake or pie etc you blitz your Oreo's or Graham Crackers (or digestives if you are in Australia) in a food processor and add melted butter and sugar. Well I made one big homemade Oreo cookie and used it as my base. No blitzing. No melted butter. No added sugar. 

Why....??? Because no one else has done it and I wanted a challenge. LOL. I Googled 'Oreo base' and all I came up with was the crumbed biscuits bases not a full 'biscuit' so I am saying I am the first so there. LOL.

So first things first I needed an Oreo recipe. Got it. So on to the work. 


 I used a 6.5" springform, leak proof pan. 

 Make your Oreo cookie dough and then roll out to a 1/8 inch thickness.
I think mine was a little thicker than that but not matter.

 I took my tin and with a knife I cut out the dough to be about 3/4 inch wider than 
the bottom of the tin. 

 This was the hard part and it was a mess in the end but it worked when cooked.
I pushed the round dough in to the tin and then 'mended' all the rips and gaps
with the left over dough on the bench. 

 Close up of it - mess and all.

 Cooked it for 6 1/2 mins at 180 degrees celsius. 
The cookies are supposed to be cooked for 10 - 12 mins at the small size so thought
this was perfect time.

 Here are the cookies I made with the left over dough. 

 Made a NY based style cheesecake and poured in to the tin on top of 
Oreo base. I cooked in oven at 180 degrees for 12mins and then reduced temp 
down to 120 degrees for 45mins. You could take out as soon as you think it is ready.
Different ovens - different times normally. 

Sorry about the horrible plate but the hazards of having kids. I put on plate and 
then realized I needed to take a photo. You get the idea though. 

 This was the finished product. Oh so yummy. Fluffy and the base........????

This is why I say I am good. It turned out perfectly. It didn't break when I cut the piece off. The underneath was nice and moist from the cheesecake sitting on top of it. It is not hard like I thought it might be. 

So there you have it. I did it. You have seen a first (as far as I know). 

I got my Oreo cookie recipe here.
My NY Baked Cheesecake recipe from here (I used half recipe with 2 eggs and one egg white instead of three eggs). 

Now do you think it could work with a Homemade Graham Cracker dough.....?? I reckon it could. 

Saturday, October 27, 2012

Chocolate Brownie Mousse Trifle

I call this trifle but in the traditional sense it isn't - more of a layered dessert but am going to stick to Trifle.

After making my Red Velvet Trifle yesterday I proceeded to make this dessert. This one has layers of cream, Chocolate Brownie, Italian Custard Cream, Chocolate Mousse, Brownie and then another layer of the custard cream. So so so nice. I have never had Italian custard cream before and must say that it is so yummy. Pretty much custard but oh so much better than the store bought one and a lot thicker too. 

I used the Chocolate Mousse recipe that I always use - can be found here

Basic Brownie Recipe
  • 400g caster sugar (2 cups)
  • 225g butter, melted
  • 60g cocoa powder
  • 1 teaspoon vanilla extract
  • 4 eggs
  • 225g plain flour (1 cup)
  • 1/2 teaspoon baking powder
  • 1/2 teaspoon salt
  • 60g walnut halves

1. Mix all ingredients in the order given. 

2. Bake at 180 C for 20 - 25 minutes in greased baking tin. 

3. Cool and cut out circles with circle cookie cutter.

Tip: I halved the mix and baked in two pans so I could cut at least 16 circles to fit in the cups. I reduced cooking time to 15mins - I did over cook on purpose as I have put the yummy goodness to add with it. 

RECIPE: ITALIAN CUSTARD CREAM (Makes about 3 cups, enough to fill and ice one 9-inch cake) from Baking with Cake Boss book. 
2 1/2 cups whole milk 

1 tablespoon pure vanilla extract 

1 cup sugar 

2/3 cup cake flour, sifted 

5 extra-large egg yolks 

2 teaspoons salted butter 

Put the milk and vanilla in a saucepan and bring to a simmer over medium heat. 

In a bowl, whip together the sugar, flour, and egg yolks with a hand mixer. Ladle a cup of the milk-vanilla mixture into the bolw and beat to temper the yolks. 

Add the yolk mixture to the pot and beat over medium heat with the hand mixer until thick and creamy, about 1 minute. As you are beating, move the pot on and off the flame so that you don’t scramble the eggs. 

Remove the pot from the heat, add the butter, and whip for 2 minutes to thicken the cream. Transfer to a bowl. Let cool, cover with plastic wrap, and refrigerate at least 6 hours. Will keep for up to 1 week. 


Friday, October 26, 2012

Red Velvet Trifle

In an attempt to make something yummy for a trivia night tomorrow night I thought I would make some red velvet something. My first attempt was the Red Velvet Pudding I made a couple days ago but that didn't go down too well with anyone except my No. 2 son who said he loved it but not too sure about that. 

Back to the drawing board. So Hubby said he doesn't like red velvet cake. Well - why not...???? I got him to try some last night after I cooked a slab of it and his response was - "It tastes like cake!". Well der but hello it is red velvet. Anyway. I am ashamed that my hubby doesn't like it. Just made. Anyway - this recipe is yummy and it has now been made in to Red Velvet 'Trifle'. Not trifle in the traditional sense as it has no jelly or custard but I guess the modern day type with the individual glasses. 

The Red Velvet cake was cooked but I actually halved the recipe but did one cake last night and another today (but to find I didn't need to- dang it - as I had to cut the 'rings' of cake in half as they were really thick). Made the 'Cheesecake' to go with it and blitzed some Oreos in my food processor. Yummo. 

Red Velvet Cake (my halved recipe)
1 1/4 cup plain flour (I used cake flour though)
1 cup sugar
1/2 Tbs cocoa
1/2 tsp salt
1/2 tsp baking soda 
1/2 cup buttermilk
1/2 Tbs vinegar
1/2 tsp vanilla 
25gms red food colour

Preheat oven to 180 degrees.
Grease and flour a cake pan. I used a 10 x 10 inch cake pan
Lightly stir eggs in a medium bowl with a wire whisk. Add remaining liquid ingredients and stir together with whisk until blended. Set aside.
place all the dry ingredients in a mixing bowl and stir together with a wire whisk.
Add wet ingredients to the dry ingredients and mix on medium-high speed for about a minute or until completely combined.
Pour into cake pan and drop pan on counter to get rid of air bubbles.
Bake for about 25mins or until a toothpick comes out clean.
After ten minutes, remove from pan and cool completely on a wire rack. Cover in plastic wrap when cooling. 

Cheesecake
2 x 250g Cream cheese
1 can sweetened condensed milk
1/2 cup whipping cream
1 tsp vanilla
Mix both cream cheese blocks in mixer until really creamy. 
Add the sweetened condensed milk and mix until well combined. Add cream until mixed well. Add vanilla. 
To layer:
Get a circle cookie cutter that will cut a circle the size to fit your glass - I used a 2 3/8 inch cutter and cut out the required number of cake. I cut out 8 circle and then cut them in half so I had 16 circles. 
Blitz 1 packet of Oreo cookies in food processor and heap a large spoon full in to your glass/cup. Grab a spoon full of cheesecake mix and put on top of Oreo's. Layer a circle of cake and then another layer of cheesecake. More cake and then more cheesecake. Top with a small sprinkling of Oreos. Done. 

Just the ingredients before ready to go. 

Wednesday, October 24, 2012

Red Velvet Pudding with Cream cheese

So I love red velvet. You all know that. I know that. I can't get enough. If I could I would eat it at least once a day - the cake especially but alas it is packed full of sugar, so it is definately a sometimes food for me here. No one else in the house is much of fan - go figure. My little girl likes it but is not in love with it. Boo hoo. 

Anyway - I bought an instant pudding mix the other day and it tastes good. Even though it was sugar free and fat free I still love it. So thought I would try and make it myself here at home. While looking up recipes I wondered if anyone had done a Red Velvet Pudding - yep sure had. I got the recipe from here at Completely Delicious. Absolutely awesome.

As no one else in the house really likes Red Velvet (seriously - oh the horror) I thought I would half the recipe. I did not make the pudding pie just the pudding. I made a 'Cheesecake' and crushed up some Oreos and tossed on to the top. The pudding by itself is really yummy and I must say that all of this together is so so so yummy. I think it is the 'saltiness' of the Oreos or the cream cheese in the topping. Either way it is yummy. 

My 7yr old son tried the pudding by itself and did not like - in fact my little girl didn't either so she has a separate dessert with just the topping and some oreos but she will live. Anyway - experimenting is good. You can't have triumphs all the time and I think this is a mini one. Yay....!!!

Red Velvet Pudding
3/4 cup whole milk
1/2 cup whipping cream
1/4 cup sugar
20gms cocoa (I just put in half a 1/3 cup)
2 large eggs
1/2 cup buttermilk
2 Tablespoons corn flour
21gms unsalted butter
1/2 tablespoon red food colouring
1 teaspoon vanilla extract
Directions:
Combine milk, cream, sugar, and cocoa in a medium saucepan and stir to dissolve the sugar and cocoa. Heat the mixture over medium heat until steaming and bubbles appear around the edges. 
Whisk together the eggs, buttermilk and cornflour. Add the heated chocolate mix to the egg mixture while whisking constantly. When fully combined, return the pot to the stove on medium high heat. With a spatula, stir constantly until mixture thickens, about 5 mins (mine took less than that). Do not allow to boil or buttermilk may curdle.  
Add butter, vanilla and red food colouring and stir until smooth. Strain mixture through a mesh strainer to remove any lumps (I didn't have to as there was no lumps). 
To make the cream cheese topping:In a large bowl mix 250g Cream cheese with 1/4 cup sugar. Add 200ml of whipping cream and mix until well combined. Add 1 teaspoon of vanilla extract and mix until just mixed. Add to the top of you Red velvet pudding (when cooled). 
Crush up some Oreos and sprinkle on top. Enjoy...!!!!

Sunday, October 21, 2012

Cinnabon Cinnamon Cake

For a little while now I have been meaning to make some Cinnamon scrolls. They are so yummy and my DF loves them too and seeing Cinnabon has closed down at our local shops I thought making my own would be (hopefully) just as good. 

When I found this recipe at Six Sisters' Stuff on Pinterest I had to give it a go. So for lunch I thought I would make it. I will add this is not good for your hips. This is loaded with sugar and butter and even though it is so so so yummy you will have to watch yourself - or at least you servings. 

 Next time I might make a cream cheese frosting just for something a little different. 

Thursday, October 18, 2012

Cauliflower Crust Pizza

Okay so I am now I am on a health kick. I need to stop eating all the bad stuff like full fat cheesecakes and brownies etc etc. So I am addicted to Pinterest now and I stumbled across this recipe and thought I had to try it. To say this is easy is an understatement. It is so big and so filling and I actually used about a quarter of the cheese but used tasty cheese not Mozzarella (I didn't have any).

I found the recipe here at Eat, Drink, Smile - but there are so many on the net to choose from - use the one that best suits yourself. 
This is 9"  and gosh is it big. The recipe says to make 3 but I just 'riced' enough cauliflower to make the one for myself and seeing my hubby asked me to do one vegetarian dish for him a week I thought I would do this often.  
 I precooked the capsicum, tomato, mushrooms, spinach and chicken and grilled it. If you make this make sure you don't leave the baking paper underneath the pizza as it burns. Oh dear did I find out first hand. Burning baking paper is not a nice smell. But the pizza was oh so devine and so filling. 
Almost finished it in this picture. I tell you what the outside of the crust was so crispy. You will love this. 

Wednesday, October 17, 2012

Toblerone Cheesecake Bars

Okay if you haven't noticed - I have a serious cheesecake addiction. I love everything cheesecake. 

I had a sister of a friend suggest I try Pinterest as I wasn't on there. Oh gosh. Bad mistake. I should have stayed away. I can't stop looking at yummy yummy food. I just can't help it. It ain't good for my waistline and my 'diet' I am on. I can't help myself when this is involved. The temptation is just too great and I had to have a taste - and then a second taste - and just for good measure I had to make sure it really did taste good. LOL. Ahhhhhh...!!!! Oh for some self control. 

I have been meaning to try Toblerone Cheesecake for years - I mean it. My sister made it about 7-8yrs ago - yes that long ago. You see she used to live just around the corner from me. We saw each other every day even after my first born arrived - probably more so after he was born. Now she lives 6 hours away by car - boo hoo. I miss her so much. Anyway back on track - when I tasted it - oh wow so yummy and thought I needed to try it at the time. 

Fast forward 7yrs and I decided to give these 'bars' a go. Wow so yummy but must admit that it is not what I remember. Different recipe granted, but even still it tastes 'different'. Must be the sour cream in it. Or maybe just coz I have been making so much NY Baked cheesecake that this tastes different to that. No matter. 
I did over mix this so when I took it out of the oven it cracked like a b$#@h. Bugger. Good thing I could drizzle melted Toblerone on top and sprinkle chopped bits on top too but it does make it hard to cut the set chocolate though. I will next time maybe try one more egg in the mix and a couple tablespoons of flour just to make it to my liking. 

If you want to give this a go - I got this recipe from Once Upon a Cutting Board

Now I have to figure out how to at Pinterest to my blog posts. I can't seem to figure out how to do it on the new Blogger. 

Monday, October 15, 2012

Bailey's Cheesecake Cupcakes

Oh wow oh wow oh wow...!!!!

You would not believe how delighted I am to have tried these babies out. Being a devoted cheesecake lover I was excited when I found a recipe (or several) for Bailey's cheesecake. Yummo. Nothing like the hidden awesomeness of some 'plonk'. 

I found one with the most Bailey's in the recipe - coz you know you have to be able to taste the alcohol or it just ain't worth it - so definately adults only. Only trouble is they are so so so yummy that I had about three of the babies and I am on a 'diet' - eeeeeekkkkk....!!!!!

I don't do process photos most of the time so sorry for that but there isn't really much to it. 


 Oh so so so creamy and yummy. 

I used an Oreo base for mine.

I got the recipe here at Baked In.

I made 1/3 of the recipe - so one egg and I just estimated the other amounts (not hard). I made 6 cupcakes. Mine look totally different to Baked In. 

Saturday, October 13, 2012

Mini Baked Cheesecake Bites

I love a good cheesecake. Can't go past it. So I have been playing with some cheesecake ideas and decided when I offered to make something yummy for a little boys 3rd party I decided to make cheesecake cupcakes. 

These have to be one of the easiest recipes I have tried. I just altered the New York Baked Cheesecake recipe so I could make 12 big muffin sized cupcakes and about 12-17 mini baked cheesecakes. 

With the mini ones below I didn't put the biscuits base in the bottom (I didn't think I would have much cheesecake mix left over - WRONG) but they still turned out wonderful. The reason I am calling them 'bites' instead of cupcakes is because they are so small that you eat them in one bite. 

 These are so so so tiny. I used candy wrappers. 
So the recipe. 

Here is the halved recipe as well as the alternate chocolate. 

Baked Cheesecake Cupcakes
Ingredients
Base
120g Digestive Biscuit crumbs
70g melted unsalted butter
25g Castor sugar
Cheesecake
500g cream cheese - room temp
1 1/2 tablespoons plain flour
1/2 cup castor sugar
2 extra large eggs room temp or 3 medium eggs
50ml whipping cream
1/2 teaspoon vanilla essence
1 Tablespoon lemon zest
Preheat oven to 180degrees.  
Mix biscuits, butter and sugar together and put in to cupcake patties. Refridgerate while mixing the filling. 
Mix cream cheese, flour and castor sugar in a mixer for approx 2 mins or until well and truly combined and creamy. Add one egg at a time (about 30 secs mixing) making sure you scrap down the sides when you have combined. Add cream, vanilla and zest and mix until well combined.  
Use a small ice cream scoop and spoon in to the patties. 
Bake cupcakes for 10 mins at 180 degrees and a further 20-25 mins at 120 degrees. Make sure you don't overcook - the middle of cupcakes should be a little wobbly so make sure you check them. Mix makes approximately 18 normal sized cupcakes (depending how generous you are with the scoops).  
MINI - cook in the oven at 120 degrees for about 10 -15 mins. Don't burn them. This should make approximately 36 mini bites. 
Chocolate version - Instead of the lemon zest, melt 150-200 gms dark chocolate and add to the mix when you are supposed to add the zest. I also used Chocolate ripple biscuits instead of Digestives. Up to you. Both will taste delicious. 

Thanks for stopping by. 

Tuesday, October 9, 2012

Ashley Sweet Shoppe party invites

I have been prowling all over the net looking for awesome kids party ideas and the idea I like the most is The Sweet Shoppe party idea. So I thought I would make an invite of my own for my little girl. We are having her party really early this year as last year she didn't have anyone who could come. With lots of experimenting I came up with this. The digital kit is from Sweet Shoppe Designs (of all places). LOL. 

 close up

Monday, October 8, 2012

As The Crow Flies Blog Hop

Welcome and thanks for hopping along for the Mad for Markers - As The Crow Flies Digi release day. Have you had a look yet....??? These stamps are darn cute to boot and a wonder to colour. 

There are four new stamps released today:
Pinwheel
Raindrop
Jesse 
and
Ice Cream boy - which I have decided to use for today. 

You can purchase these wonderful stamps from Mad for Markers - as well as the ones from last release HERE

If you have came from Sam's blog you are in the right place but if you haven't why don't you join in the hop and start at the Mad for Markers Challenge blog.  
 I made our Ice Cream Boy have red hair. My eldest has 'Strawberry Blonde' hair and he is gorgeous so thought I would make him look similar (minus the freckles).
Markers used:
Skin: E000, 00, 11, 04; Hair: E33, 08, YR14
Cone: E41, 53, 55; Ice Cream: Y35, RV25, B04, YG07
Tshirt: W5, 3, 1, 0, blender; Shorts: B91, 95, 97, B06
Shoes: R22, 14, 17, 29, W5
Other: Sky- B0000, Pavement: C7, C5, C3

Thanks for hopping by for the As The Crow Flies release blog hop - next stop is Mel's blog
have a good one 

Friday, October 5, 2012

Snickers Brownie Balls

I love love love love love Snickers bars. They are so peanuty and delicious and if I start eating them I can't stop. In fact I love putting them in the freezer for a little while so the caramel in the middle freezes. SOOOO nice. LOL. 

I found a Snickers Brownie bites recipe a while ago and I made them but they didn't turn out quite right so I decided to make them in to a base for a cheesecake slice which didn't work out either. I used Lower fat cream cheese and it didn't set. But when I threw the whole lot in the bin (as no one would eat it) I thought it would be awesome to make them in to Brownie Balls. There are a lot of recipes on the web for Snickers Brownies - but none for actual balls. Not hard really.

Just look up and use your favourite recipe for Snickers brownies,  cool the whole lot ( I made these while the brownies were warm and found it easier though ) but not too cool as you won't be able to roll properly. Cut up the slice and then put in a food processor. Blitz until the whole lot is cut up and starts rolling around in the processor. Grab a spoon and take out a bit of mixture and roll. Easy peasy. 

I dipped half the balls in to milk chocolate but might go dark chocolate next time - but damn it is so so so nice. I left some without chocolate as they are so yummy by themselves. I was thinking I might crush up some peanuts next time and roll some of them in it. Yummo. 

The peanut on top makes it that little bit salty which is divine. 
The recipe I used made 72 balls. You can find it here

 The mess after dipping.

 With the left over chocolate I made some chocolate lollipops for the kids
and dipped some sugar cookies. Can't go past some Hundreds and Thousands. 

The cake pops below are what the kids and I made the other day with the kit my 
good friend Paula gave me for my birthday. In fact we still have some left after 2 days. 
Miracle. 

Wednesday, October 3, 2012

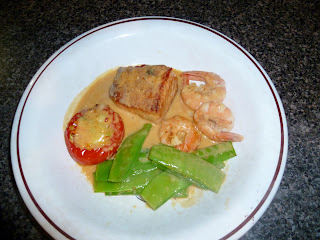
Yummy yummy salmon

Before I started doing all the naughty foods that I have been making I used to make nice healthy stuff - and still do - just haven't posted up here on my blog. So I thought I would show you some healthy stuff. To start with I thought I would show you the Salmon and Prawns with Spicy Coconut Broth and baked baby capsicums. 

I fell in love with Salmon last year when I attended the dinner for the Kinder in December and always wanted to try cooking it myself ever since. I found this recipe (minus the capsicums) at Taste.com here. This is super yummy - don't know how healthy it is but has no added salt and only uses brown sugar so can't be all that bad right. LOL. 


The capsicums were stuffed with 'cauliflower' rice with grated zucchini and carrot with a little chicken stock. I can't remember how long they took - probably 25 - 35mins - just don't burn them. Here in Australia, if you are lucky you can pick up the mini capsicums in the produce department at Safeway (which is where I got mine). 

I made the broth with Oyster sauce not Fish sauce - for some reason I get an instant headache with the fish sauce. Go figure. It still tastes good.