G'day everyone. Hope we are having a great day.
Most of the cards I make are 6"x6" and I have been searching and searching for a tutorial in blogland (my name for it) and have not been able to find one, so I made this tutorial myself. I found a tutorial for a 3"x3" card holder (mini magazine holder) @ I
nking Idaho and thought it would be easy - all I had to do was double the measurements - not to be. The first one I made with double the measurements was not long enough to fit 6x6" cards so HERE IS MY TUTORIAL.
Materials needed:
Cardstock 14 1/2" x 16 3/4"
Cardstock 20 1/2" x 2 1/2"
Bone folder/scorer
Ruler
Pencil
Scissors
DSP and embellishments (whatever you want).
Note: I bought the cardstock at my local craft shop. It measured 33 1/4" x 23 1/2" and was enough to make two of these. You can buy smaller cardstock but make sure it is enough to fit both pieces of cardstock that you need as 12"x12" card just won't cut it. This card was also 220gsm so it is heavier than some that were there.
________________________________________________________________ 
- With your 14 1/2" x 16 3/4" piece of card - on the long side, draw a line at 7 1/2" & 14" - you should have a section at the bottom measuring 2 3/4". Click on photo to see the measurements.
- Turn card and measure at 6" from both sides - which should leave you with a strip in the middle that is 2 1/2" for the spine.
- Draw all your lines and do score lines where indicated on my picture.

- Score all the dotted lines and cut all the solid lines (like picture). Make sure you fold all the score lines so they are nice and crisp.

Fold up the 2 3/4" section so it sits like this (see picture).

Fold in the two 3" sides so it is sitting like this (see picture).
Note: I would use doublesided tape to stick these sides down to the side of the holder (on the inside) as it tends to sit out a little bit.
Fold up the 7 1/2" piece (spine) so it is sitting in the middle of the 3" bits.

With your 20 1/2" x 2 1/2" cardstock score at 2 1/2", 9", 11 1/2" & 18". This is going to be used to wrap around the whole holder.

Wrap doublesided tape around holder (like picture) so the pieces fit nice and snug.
Decorate your 20 1/2" x 2 1/2" piece of card as you wish before you stick it around the holder.
Note: There are three 2 1/2" bits in this piece as I stuck the end bit over the top of the start bit (hope that makes sense) - so you don't have two pieces/lines sticking out the side. 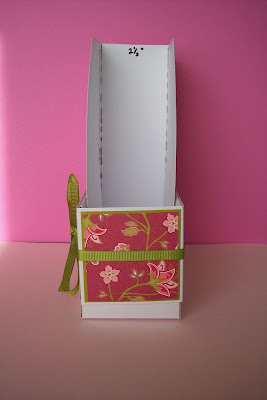
As you can see I decorated the side angled bit of card as it was way too plain.
The below picture shows a couple of my 6" x 6" cards in the holder.

All products used here are from Stampin' Up - except the craft card.
Products: Craft card 33 1/4" x 23 1/2"; Kiwi Kiss & Coral Cameo card; Raspberry Tart DSP; Old Olive ribbon; Bone folder; paper cutter; ruler; Doublesided tape; pencil.