Sunday, July 29, 2012

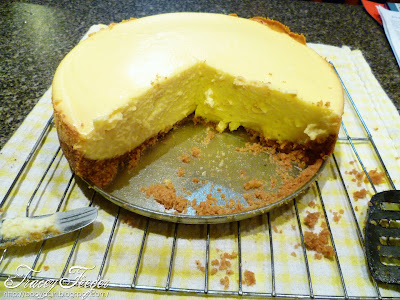
NY Style Cheesecake

Over the last couple of weeks I have become addicted to 'Cake Boss' the show about Buddy and his family business - Carlos' Bakery in Hoboken NY. In one of the episodes they go to Italy and some of the bakers there asked if they could show them how to make a NY Cheesecake. So I did a Google search and found a recipe at Joy for Baking - here. Such a simple recipe and was quite easy to make - well except for the hand mixer I have wouldn't mix the cream cheese very well even sitting at room temp for over an hour.

As I only had a 8" springform pan I decided to make a couple of small ones without the Digestive Biscuits. Turned out really well - and the bonus is that I can freeze them and eat another day. It is creamy and very rich - but oh so yummy. It wasn't wobbly in the middle. I cooked for 85mins.
Right out of the oven. We ate it hot but can't wait to try it cooled down. This recipe calls for sour cream and sugar mixed as a topping but we opted not to have that.
Yummo.....!!!!

New York Style Cheesecake from Joy of Baking
Crust
2 cups Graham crackers or digestive biscuits (200g)
1/4 cup (50gms) white sugar
1/2 cup (114gms) unsalted butter - room temp - I actually used about 15gms more as it just didn't seem enough.

Filling
1kg (4 blocks in Oz) cream cheese - full fat
1 cup (200g) white sugar
3 tablespoons plain flour
5 eggs - room temp
1/3 cup heavy whipping cream - double cream
1 tablespoon lemon zest
1 teaspoon vanilla essence

For Crust: In a medium sized bowl combine the graham cracker crumbs, sugar, and melted butter. Press the crumbs evenly over the bottom and about 1 inch (2.5 cm) up the sides of the springform pan. Cover and refrigerate while you make the filling.


For Filling: In bowl of your electric mixer place the cream cheese, sugar, and flour. Beat on medium speed until smooth (about 2 minutes), scraping down the bowl as needed. Add the eggs, one at a time, beating well (about 30 seconds) after each addition.Scrape down the sides of the bowl. Add the whipping cream, lemon zest, vanilla extract and beat until incorporated. Remove the crust from the refrigerator and pour in the filling. Place the cheesecake pan on a larger baking pan and place in the oven.


Bake for 15 minutes and then lower the oven temperature to 250 degrees F (120 degrees C) and continue to bake for about another 60 -90 minutesor until firm and only the center of the cheesecake looks a little wet and wobbly. (The baking time can vary due to the differences in ovens, so make sure to check that the cheesecake is firm with only the center being a little wet and wobbly.) Remove from oven and place on a wire rack.


Remove from oven and carefully run a knife or spatula around the inside edge of pan to loosen the cheesecake (helps prevent the surface from cracking as it cools).


Let cool completely before covering with plastic wrap. Refrigerate several hours, preferably overnight.

Wednesday, July 25, 2012

Cookie Dough Balls

I love cake balls and cake pops - frankly there is nothing more delicious but I decided I wanted to take the easy way out and make cookie dough balls or you can also do cake dough balls (didn't want to try that just yet). So I made up a Basic Cookie recipe dough and made these balls -with the help of my little missy. Can you see which ones she did.

They were chilled in the fridge for about an hour (as the candy melts didn't work for me AGAIN).
As I didn't want to use all the dough for the balls I used my new cookie cutter that I got in a Candy shape to make some biscuits - I must say they won't last long when my boys come home.
My little miss waiting for the Candy Melts to be melted. Unfortunately they were just a lumpy mess - I have resigned myself to sticking with compound chocolate or what we call Nestle Melts (here in Australia). Apparently Cadbury now have their version of the Melts. Yet to find in a supermarket.
Here is the finished products. I must say they are divine. Can you think of all the other possibilities - mint, choc chip, caramel, chocolate - wow so many variations. I love them. Ashley (miss) likes the dough by itself LOL typical. She would lick a bowl clean when I make a cake. She loves the mix.
Basic Cookie Dough
1Cup flour
1 Cup of self raising flour
1/2 cup of sugar ( I used castor sugar)
125gms butter (I used unsalted)
1 egg
pinch of salt

Cream the butter and sugar until fluffy.
Add all other ingredients and mix together. If too dry add a touch of milk.
Flour a bench or board and knead your dough.
Make in to balls and refridgerate for 30mins.
Melt some chocolate and coat the balls. Leave to dry. I have pop mine in fridge so they are nice and firm.

For cookies just roll dough with rolling pin and cut out shapes. Cook in oven at 180 degrees for 15mins or golden brown.

Tuesday, July 24, 2012

Choc Peppermint Cupcakes

Yes more yummy naughty food and oh so delicious too.

Lachlan was so disappointed when we made more Macarons yesterday that I didn't do the Peppermint cream for the filling like I said I would so I cooked up a Duncan Hines Devils Food cake mix and made my own buttercream with Peppermint Essence and food colouring. Ta dah....!!!!! Gotta add some Peppermint Crisp on to the top - in fact it is what makes these cupcakes so yummy - the topping. Next I think I will get some Peppermint flavoured Aero chocolate and put in the middle.


I love coconut so I am thinking I will make a coconut cupcake or even some coconut cookies. Yummo.

Sunday, July 22, 2012

Chef in the making

My middle child Lachlan is 6yrs old and he is so much like me. Anything he puts his heart in to creatively he does his best at and most of the time is really good at it too. He 'builds' things. Most of the time he is grabbing boxes that are ready for recycling and cutting and sticking them together to make something - anything - he just builds. He told us one day that he is going to be a builder. Fantastic mate you go for it was all he got from us, as we are as proud as punch that he is so talented.

A couple of months ago - out of the blue - he tells us he wants to be a chef. Don't know where he got the idea from and I have been very tentative to let him 'create'. I am sure he will be good at it if he get the opportunity to actually do some cooking or baking. So I bit the bullet on the weekend and let him 'create' some macaroons with me. We made traditional macaroons that made very little of them so next time we will be doubling the recipe.

Here he is 'mixing' the egg whites.

Meringue ready for the almond flour and icing sugar mixture.
I didn't take any photos other than the finished product after this.
Here is the finished product. As you can see this is only a couple of them. I had a few of them crack on me and some of them were way too big but for my first go they were good. First time I have tried tasting them too and I love them. Unfortunately I ate most of them because they were so mouthwatering good. As you can see there are lumps and that is after sifting the flour/icing sugar mix three times. Maybe it was my folding technique - I simply don't know but we did it and hopefully it will work out better next time.

I got the recipe for these at Martha Stewart here.

Wednesday, July 11, 2012

Fudge cupcakes with a twist

Recently I have been making lots of food and experimenting with different dishes. Most of it has been healthy sugar free foods but I have been researching party food and came across a blog that has 'experiments' with cupcakes, it is called Bake it in a cake. Although this creation did not come from her site the idea certainly did so I must give credit. It is great to see so many different ways of having cupcakes.

My kids loved them - or at least they said they did but I have no idea as I can't eat them.
If you are in Australia you know what a Mint Slice and Caramel Crown biscuit/cookie is. I just put a little bit of the cake mix at the bottom of the cupcake paper and then put the biscuit on top (flat) and then more mix on top. Next time around I will put less mix at the bottom.

Tuesday, July 10, 2012

Fairy Wishes once again


Good afternoon my lovelies. What an awfully dreadful day it is here in Melbourne but at least I don't have to do a school run due to the holidays although the noise and carrying on by my kids is driving me a little bonkers.

Anyway this card is for the sketch over at The Sweet Stop. I used an image by the very talented Sureya at DeviantArt. This one is called Little Leaf Fairy. I must say she was a dream to colour. What do you think...??? My 6yr DS thought her hair was very realistic looking and asked me how I did it and could I teach him LOL. Yes my boys when you have had lots of practice. Boy is he gonna be a Jack of all trades. Anyway. Here she is.


Friday, July 6, 2012

Blender Challenge entry

Good morning everyone. Wow it has been a long time since I did a post for Mad for Markers and I am truly sorry to Miss Sammi but thankfully she has been a super duper friends and understands my woes. Anyway - a card to enter in to the Blender Challenge at Copic Oz. What that means is that they want you to use your blender somewhere on your creation so what better use of the blender than using it for scales on the little mermaid. I have just spotted the blender on her tail to make it look like she has scales. What do you all think...??? She is cute regardless.


Copics used:
Skin: E0000, 00, 11, 02
Hair: BV0000, 00, 02
Tail: BG13, 23, 15, blender.

Thursday, July 5, 2012

Can you see a pattern here...???

Nope there is no pattern here. It is a pattern of regular posts. Sorry for the deception but it got you to look didn't it....???? LOL. I have the colouring bug - at least for now so I am going with it. Frankly I have had such a big rut that this is amazing even me.

Anyway. This card is just another card that I wanted to make. I bought the image from JustInkLined and thought it was very cute. As soon as I saw it I imagined it as greyscale but with pink so I went with it. I layered the rabbit to make him stand out.

A very simple card made for a little girl.
Copics used:
W1, 3, 5, 7, blender
R81, 85, W1, W3, blender.

Wednesday, July 4, 2012

Purple and Yellow delight

Good morning everyone. Yep I have been busy last couple of days.

Someone asked me to make an 80th Birthday card if I could and I tried my hardest to find a nice image but didn't and then by accident while looking on JustInkLined I found one. I love this Peony and it comes on an A4 sheet with different sentiments that you can put on there. Anyway printed it off and made this card. Even though I was too late making the card my friend asked for a card with Purple and Yellow so thought I would still make it. Coloured with Copics and yellow background is airbrushed.

Copics used:
Flower: BV0000, 00, 02, 04
Stem/leaves: G20, 21, 24, 26
Airbrush: Y18

Tuesday, July 3, 2012

Friend....hooray

Oh My Lord - I am so so so sorry for my lack of posts. I have decided that I needed to pull back on the card making as 1). I have a million cards sitting here gathering dust and 2). I wanted to make a card when I wanted to make a card not when the next challenge or DT project was needed so hence why I have given up running Friday Sketch Challenge.

So I got this image from MayzyArt found here. I bought it a while ago and still love it but hit a wall and didn't know what to do with it. Thankfully after the Copic Colouring Day through Mad for Markers I got some inspiration back and decided to do the 'Distressed/Vintage' colouring that we learnt on the day. See we all need to keep learning new things so it doesn't become boring. So here she is - Shawna with Latte all vintage.


Copics used:
Skin: E000, 00, 11, 02
Skirt: G20, G24, W1
Boots: E57, 59, blender
Leg warmers: Y23, 26, W1
Sweater: E50, 53, W1,
Hair: E31, 35, W1 (are you seeing a pattern here)
Hat: Y23, 26, YR14, blender
Scarf: R85, 81, W1


This card was not made for any challenges. Just made it for the fun of it. Just a note - when you are trying to do the Vintage look use very limited colours. You don't want it to look like your normal colouring.